Zoom - Recording Management
Purpose: Instruct users to record a meeting and download a recording in Zoom as well as upload the
recording to YouTube and Google Drive.
Reference Guide Details
Guide Objectives Upon completion, the user will be able to
● Record a Zoom Meeting
● Download a Zoom Recording
● Upload a recorded meeting to Google Drive
● Upload a recorded meeting to YouTube
Revision Date 6/10/19
Record a Zoom Meeting Error! Bookmark not defined.
Confirm Recording options are enabled 1
Starting a Local Recording 1
Starting a Cloud Recording 3
Download a Zoom Cloud Recording 3
From Email 3
From umn.zoom.us 4
Upload a recorded meeting to Google Drive 6
Upload a recorded meeting to YouTube Error! Bookmark not defined.
Additional Resources 9

1
Before you begin
This job aid will walk you through managing Zoom recordings. Additional How-To Instructions are
available from the Office of Information Technology at https://it.umn.edu/technology/zoom,
including downloading Zoom, scheduling meetings, starting a meeting, and more.
Record a Zoom Meeting
Confirm Recording options are enabled
1. In a web browser, go to umn.zoom.us. Log in with your UMN Internet ID. Click on Settings from
the left main menu.
2. In the Recording tab, navigate to the Local Recording option and verify that the setting is
enabled. If the setting is disabled, click the toggle to enable it. If a verification dialog displays,
choose Turn On to verify the change.
3. Navigate to the Cloud Recording option and verify that the setting is enabled. If the setting is
disabled, click the toggle to enable it.
Starting a Local Recording
Only the meeting host can record a meeting or grant the ability to record to a participant.
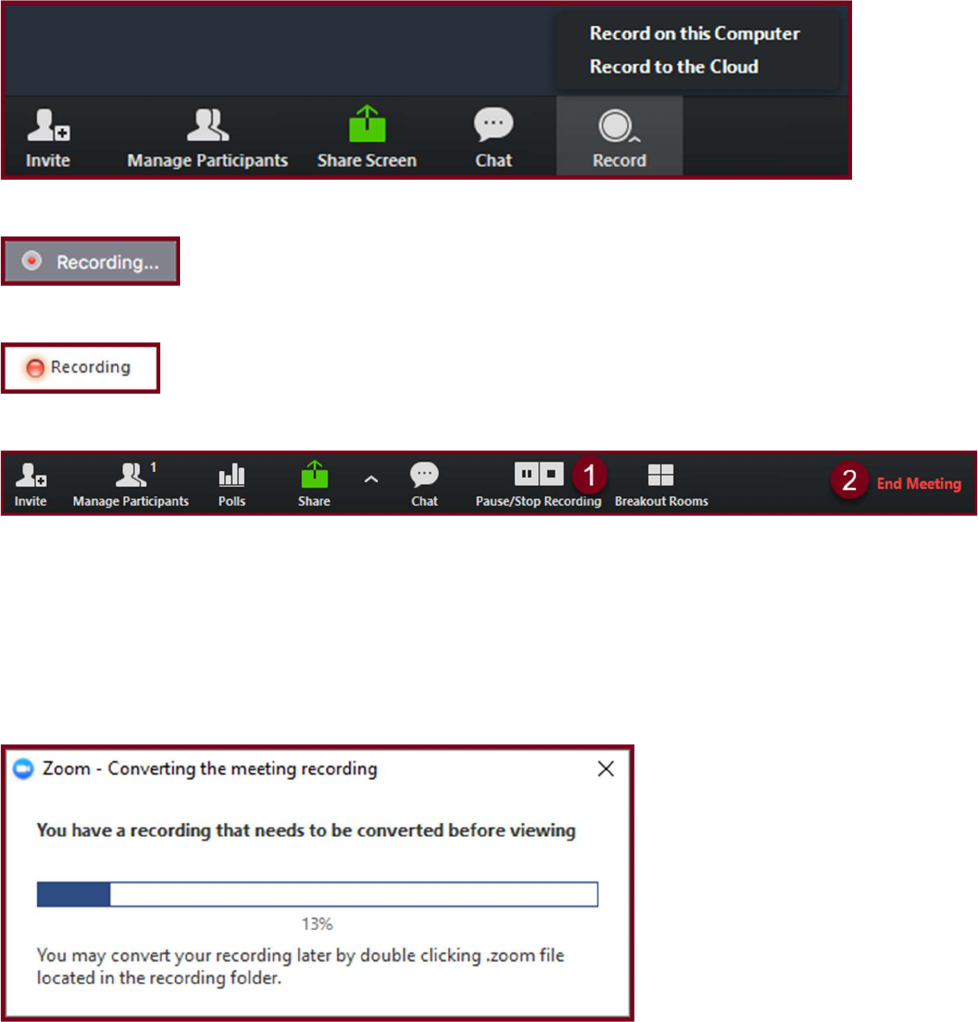
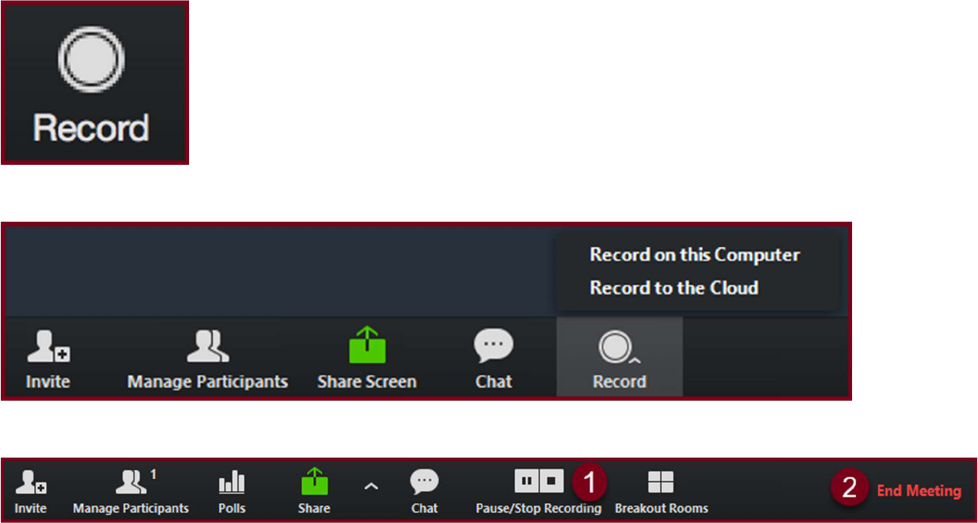
1. Start a Zoom meeting as the host.
2. Click the Record button in the Zoom toolbar. If you do not see a record option, select Open to
full screen and the record button should appear.
2
3. If there is a menu, select Record on this Computer.
Hosts will see the following recording indicator in the top-left corner while recording is active.
Participants will see the following indicator in the top-left corner while the recording is active.
4. To stop recording, click Stop Recording or End Meeting.
5. After the recording has stopped, Zoom will convert the recording so you can access the files.
Depending on your settings, Zoom may ask you to select where you would like to save your
recording files. If this does not appear, by default, all recordings will be placed in a Zoom folder
found in the following file path on these devices:
PC: C:\Users\User Name\Documents\Zoom
Mac: /Users/User Name/Documents/Zoom
6. Once the conversion process is complete, the folder containing the recording files will open.
Zoom will create multiple files, by default, the audio/video file (MP4) will be named
Zoom_0.mp4. The audio only file (M4A) is named audio_only.m4a.
7. There is no need to download a local recording as it is already saved to your computer. It is
recommended that the MP4 file be used when uploading videos to other locations on the web.
3
Starting a Cloud Recording
Note: Only hosts and co-hosts can start a cloud recording. If you want a participant to start a
recording, you can make them a co-host or use local recording.
To record a meeting to the cloud:
1. Start a meeting as the host.
2. Click the Record button in the Zoom toolbar. If you do not see a record option, select Open to
full screen and the record button should appear.
3. Select Record to the Cloud to begin recording.
4. To stop recording, click Stop Recording or End Meeting.
5. Once the recording has been stopped, the recording must be processed before viewing. Zoom
will send an email to the host's email address when the process is completed. Processing can
take anywhere from several minutes to a few hours.
Download a Zoom Cloud Recording
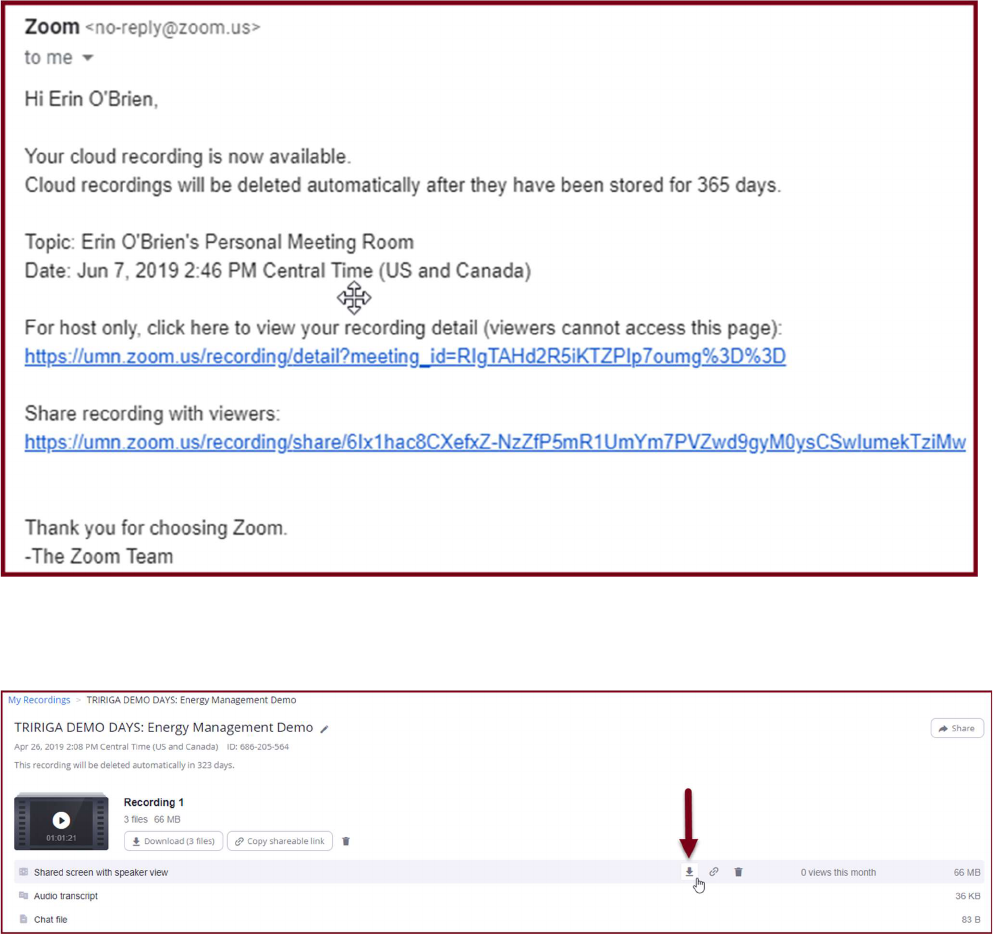
Starting from Email
1. After a cloud-recorded meeting the host will receive an email similar to the one below.
Processing can take anywhere from several minutes to a few hours.
4
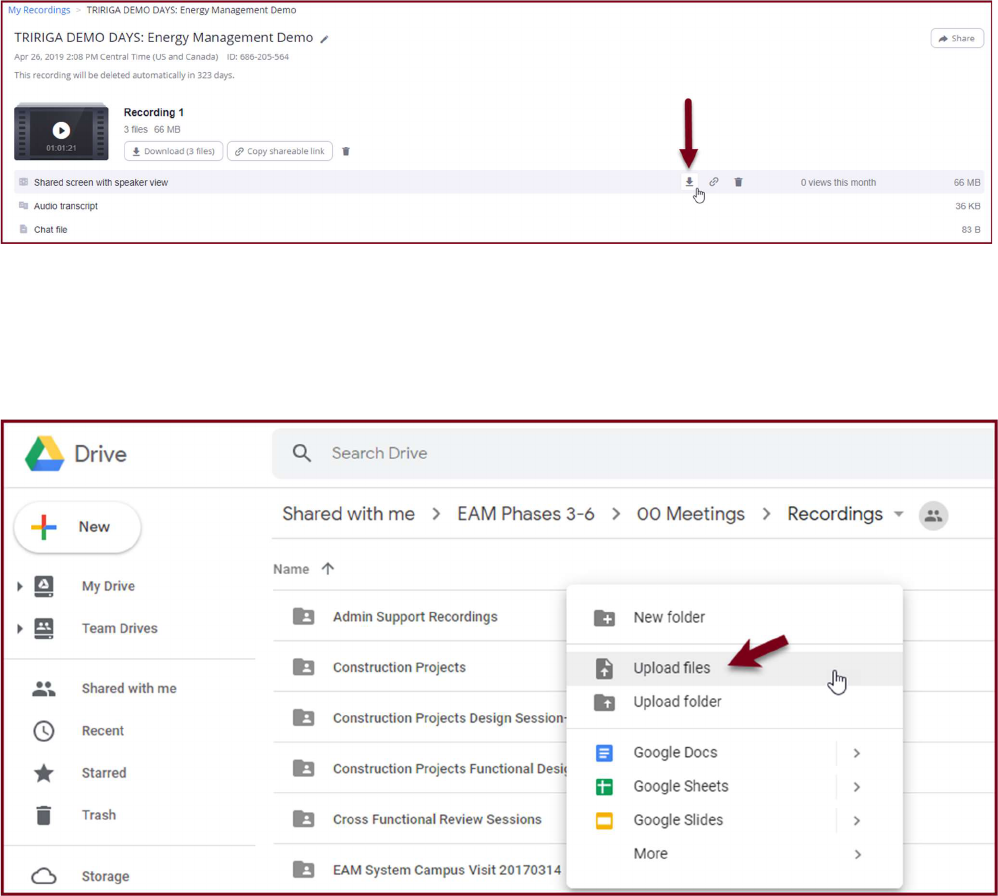
2. Follow the first link in the email. It will take you to that meeting’s recording management page
on the Zoom Web Portal.
3. Click the download arrow on the Shared screen with speaker view line.
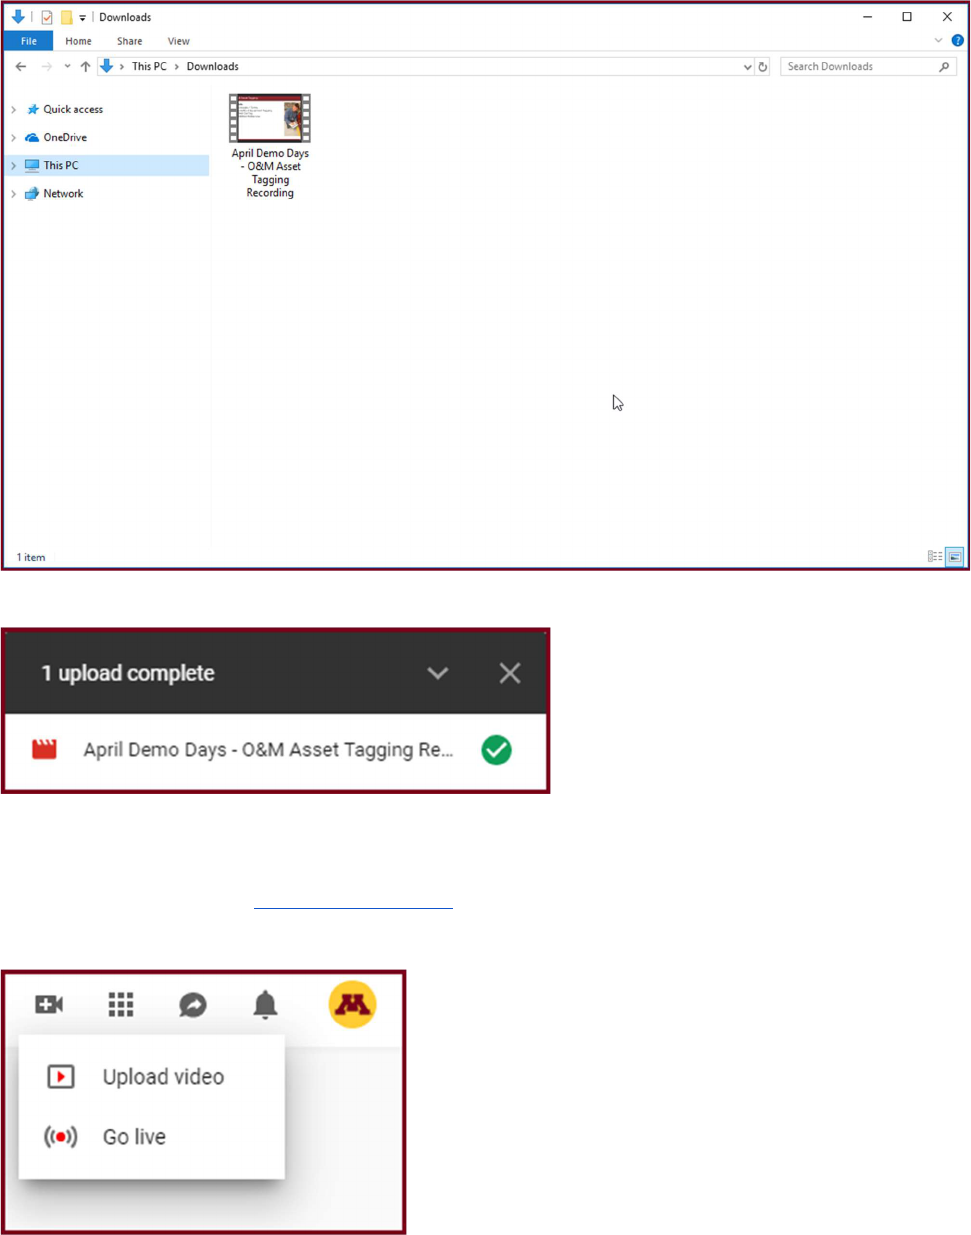
4. When the download is complete, the file will appear in File Manager in the Downloads Folder.
Starting from the Zoom Web Portal
1. Sign in to the Zoom web portal at umn.zoom.us and click Recordings. You will see a list of cloud
recordings on your account.
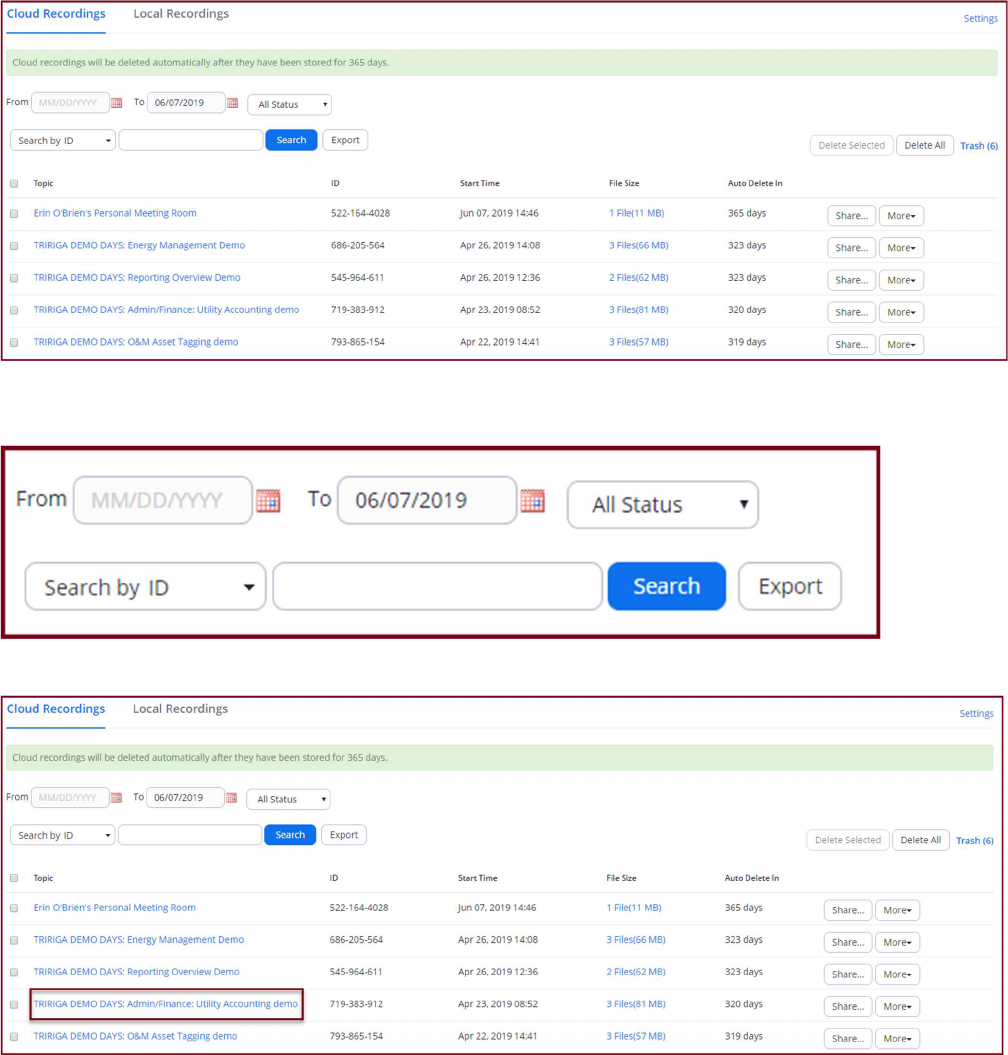
5
2. You can search the recordings using the search menu at the top. You can adjust the date range and
status, then search by Meeting ID, Topic, or Keyword.
3. Find the recording you want to view and click the topic.
6
4. Click the download arrow on the Shared screen with speaker view line.
5. When the download is complete, the file will appear in File Manager in the Downloads Folder.
Upload a recorded meeting to Google Drive
1. Download recording following the steps above.
2. Navigate to the Google Drive folder where you would like to upload the recording.
3. Right click and select Upload Files.
4. Select the file you would like to upload and select Open.
7
5. Google Drive will notify you when the upload is complete.
Upload a recorded meeting to YouTube
1. Download recording following the steps above.
2. In a web browser, go to www.youtube.com. Select Sign In. Log in with your UMN Internet ID or
the EAM Team internet ID if you would like to upload the video to the EAM Team channel.
3. Click on the camera in the upper right hand corner. Then select Upload Video.

8
4. Click on the arrow to select files to upload. Or drag and drop the file you would like to upload, if
you choose this option, skip to step 6.
5. Select the file you would like to upload and select Open.
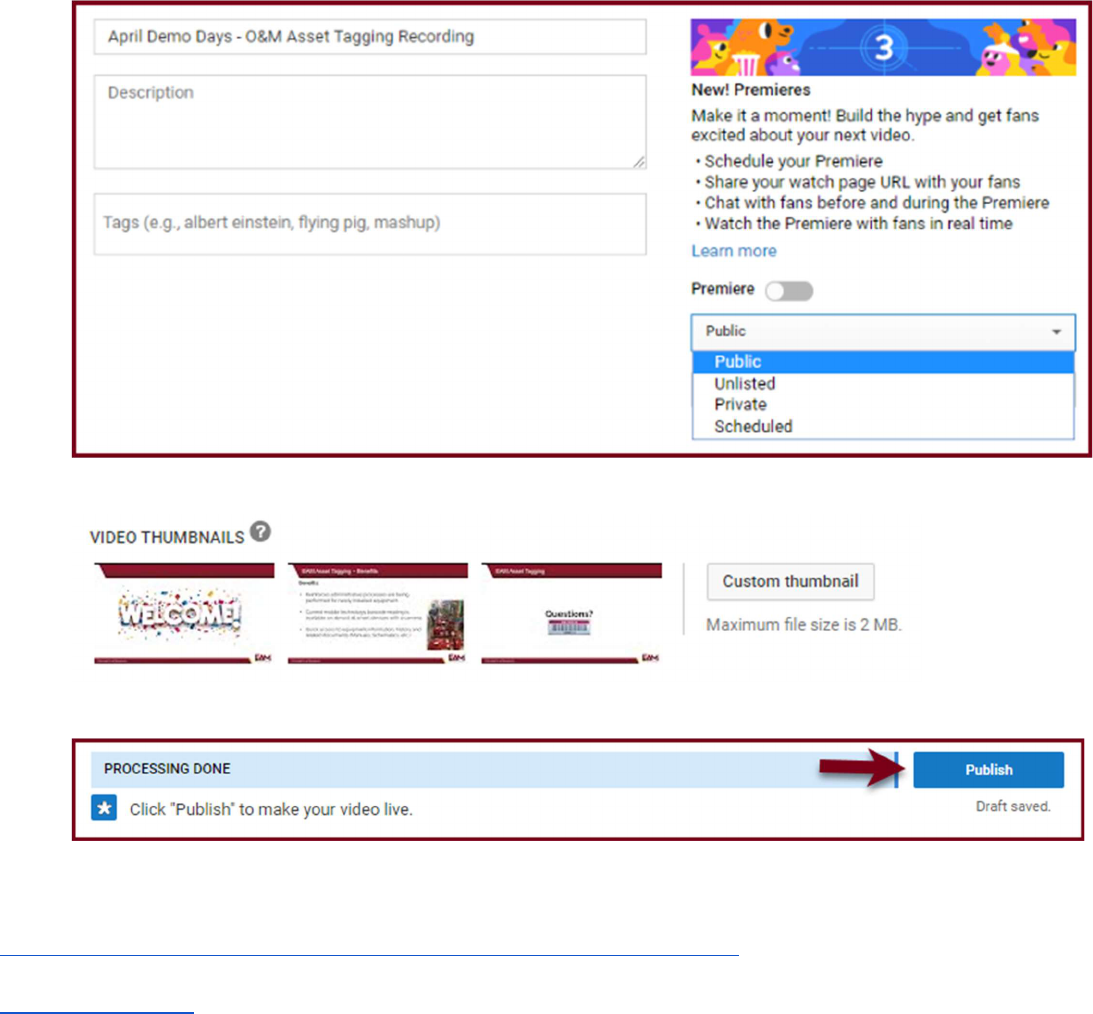
6. Edit your Title, description and tag, if you wish. On the right hand side of the screen, select the
drop down menu that is defaulted to Public and change it to Unlisted.
9
7. Choose a thumbnail from the bottom of the screen.
8. When it is done processing, click Publish.
Additional Resources
UMN Office of Information Technology How-To Instructions for Zoom
Zoom Help Center
